by Joseph Standley | Sep 3, 2012 | All Pilots
As a pilot, you have a unique view of the world that many people don’t get to experience in their lives. Those unique views can turn into a deadly MID AIR COLLISION if you’re not careful. Things you see on the ground, such as smoke can distract you. Where there is smoke, there is fire and seeing it from the air would tempt any pilot to check it out.
You have an airplane, and can fly straight to the smoke at over 120mph. No roadblocks or traffic, just a great unobstructed view! I saw this fire on my way back to the airport and had to check it out!
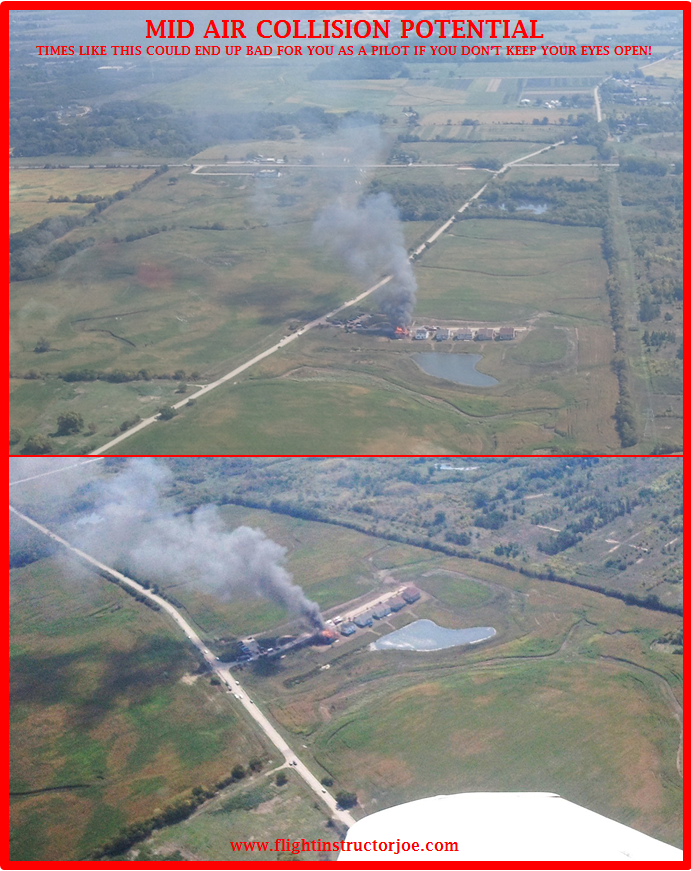
It’s cool to be able to see things like this from the air but they can turn into a mid air collision real fast if you don’t keep your eyes open. Just as it can be tempting for you to fly to the smoke to check it out, other pilots are probably doing the same thing. As I was turning right around this fire, I saw another plane on the opposite side turning left around the fire.
If we were at the same altitude and I hadn’t noticed him, we could have had a mid air collision, causing a couple more fires on the ground for more pilots to look at. Mid air collisions are more likely to happen when there is something to look at on the ground so you have to be extra careful in these areas. If you’re interested in seeing a fire, someone else probably is too. Don’t let distractions on the ground prevent you from doing your job as a pilot which is to protect you and your passengers from harm.
This post is just a reminder to all pilots, that anywhere pilots tend to migrate to is where you have to really keep your scan going. Aiports and the 45° entry into airports are other areas where you should really pay attention. I know it seems like common sense but it’s easier than you think to become distracted, so be careful and avoid a mid air collision by keeping your scan going at all times.
by Joseph Standley | Aug 24, 2012 | All Pilots
You’re almost at your destination airport. You’ve never been there and you are unfamiliar with the area. You can see where the airport is in the distance but are unable to see the runway. You have to start thinking about entering the 45 to get into the pattern but how can you figure that out if you can’t see the runway?
I’ve flown with many people that have a hard time figuring out where the 45° entry is. They try to imagine the pattern but stilll struggle with it. Unless they see the runway, they get confused. There is a super easy way to figure this out as you will soon see. Let’s start by looking at the image below.
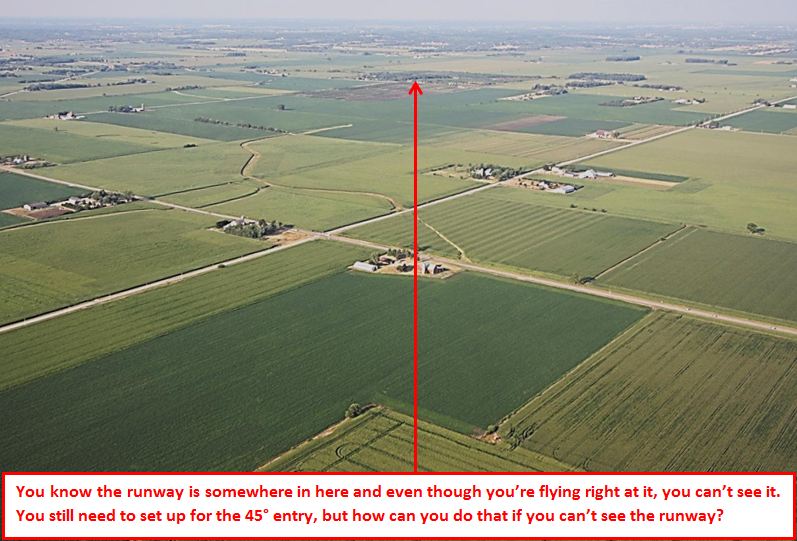
You’re almost at your destination airport in an unfamiliar area and you need to get set up to land at an airport you’ve never been to. You’ve narrowed the location of the airport down to one area but can’t see it yet. You don’t need to see the runway to set up for a landing, you just need to know where the airport is.
It’s really easy to figure out. To make this easy for you, we will start with the first step. You should be flying directly toward the area where the airport is. Now look at the area where the airport is and imagine a vertical line going right through the center of it, dividing the airport area into a left and right side. Now do the same thing with a horizontal line making a near and far side. See image below.
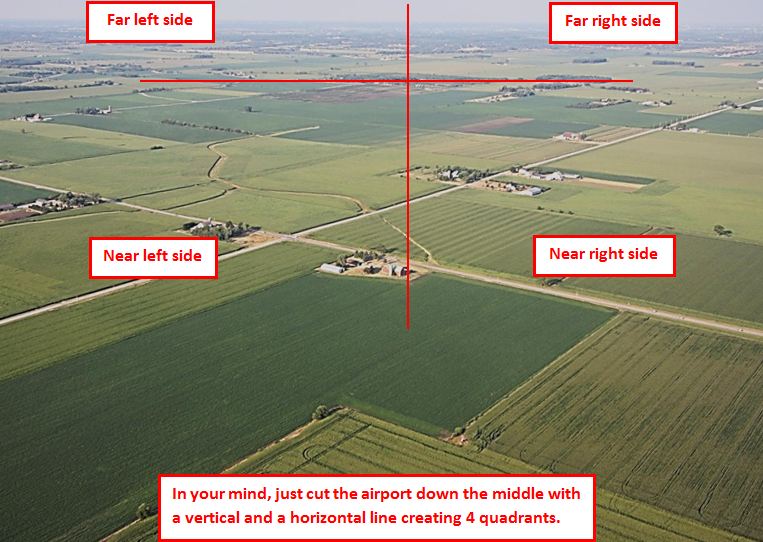
Once you have imagined the airport split into a left and right side and a near (area before the airport) and a far (area past the airport) side, then we will figure out which one of these quadrants the 45° entry will be in. In order to do that we need to know what runway we will be using.
For this example we will assume we are using runway 7. As you should know by now, 70° is the number that runway 7 is associated with. With that in mind, we will move on to the next step which is to look at the heading indicator and find 70°, which represents the runway we will be using. See below.
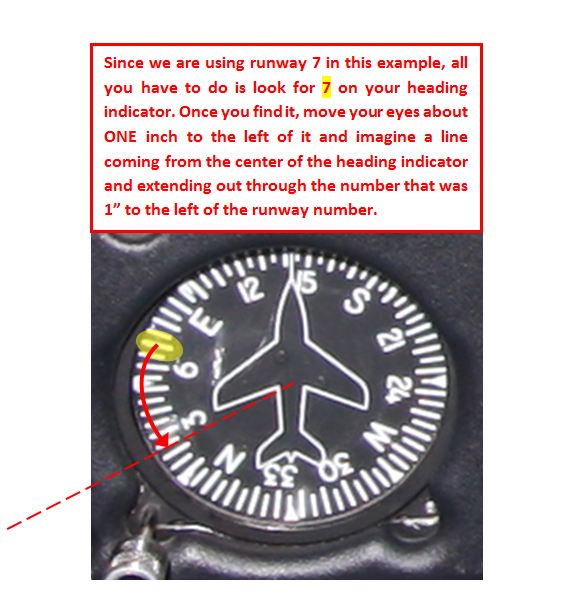
So far all you’ve done is image the airport area divided into a near and far side and a left and right side for step one. For the second step all you had to do is find the runway number on your heading indicator and look one inch to the left of it while imagining a line extending out through that point from the center of the heading indicator.
There’s no need to remember any other numbers or do any math. Just remember where that line you imagined is because the next step may make it more clear. In the next step, you are going to repeat the first step by dividing the heading indicator into 4 sections just like you did with the airport area in the first step! See next image.

Are you beginning to see the picture yet? The line you imagined coming out from the center which is one inch to the left of the runway number (dashed red), is where your 45° entry is. The 4 sections are the same as those that you imagined with the airport area and you can see which section you need to be in for your 45° entry to the airport. According to the image above, you would enter from the near left side of the airport. See below for a better visual putting the 2 examples together.
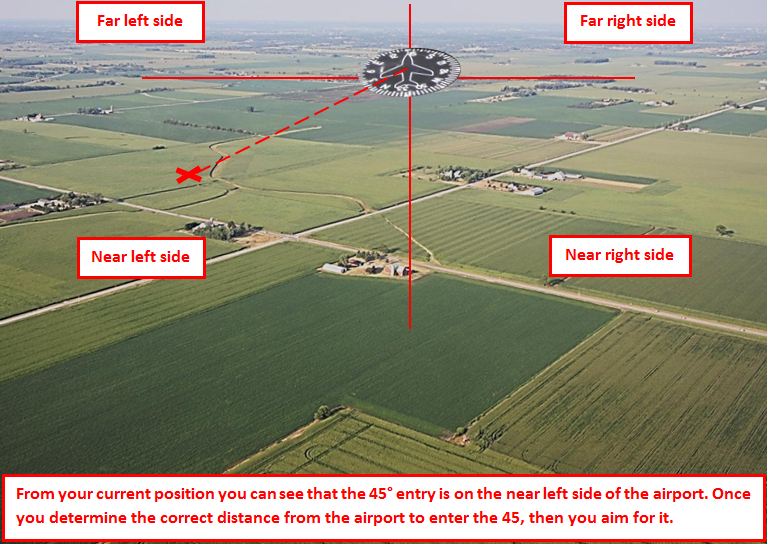
The only thing you have to do now is figure out how far out from the airport you want to enter the 45. If you plan to be about 2 1/2 to 3 miles out on the 45 then you just have to estimate that distance as I did with the X in this example and start heading that way! When you get there, just turn toward the airport area and fly directly to it.
Since you are doing this without seeing the runway, it is possible that you may be off a mile to the left or right but you will still be in the right area when making your radio call on the 45. As you get closer, just keep scanning left and right of your course as well as looking straight ahead and the runway will eventually come into view. Once you see it, you can change your heading slightly to get heading exactly where you need to be.
A couple of things to remember: Your entry is where the dashed line is. When moving one inch to the left of the number, you move left as you read the number, so when the number is upside down, you have to imagine which way left would be if your head was upside down reading it.
If you are flying into an airport that has a right hand traffic pattern, the only thing that you have to do different is to find the runway number and move one inch to the right instead. Give this a try and let me know how it works out for you!
Please leave a comment below and sign up for our newsletter for many more flying tips sent right to your email.
by Joseph Standley | Aug 2, 2012 | All Pilots
ARE YOU THINKING ABOUT BUYING A PLANE BUT AREN’T SURE WHETHER IT’S WORTH IT?
I’ve had many students that have completed their private pilot training and immediately bought their own plane afterwards. Some actually buy planes before they even get their license! So which is better? This really depends on you and your defintion of better.
From a cost standpoint, it is usually cheaper to rent. I say usually because most people only fly 50 hours a year. If you’re someone that plans on flying a couple of hundred hours a year or more then renting may not be for you. From a convenience standpoint, it is better to own. They both have advantages and disadvantages. Let’s look at some of them. We will start with renting. (more…)
by Joseph Standley | Aug 2, 2012 | All Pilots
When compared to flying an airline, flying small plane has some nice advantages! If you’re only traveling a couple of states away, then a small plane would probably be better. A small plane doesn’t seem like much of an advantage at first glance, but let’s look a little closer. (more…)
by Joseph Standley | Jul 4, 2012 | All Pilots
When you hear the term “high density altitude”, do you get confused as to what that means? Most people do, so don’t worry! We’re going to clear it up once and for all and talk about how it affects you. Before we start, I’d like to clarify something. The images below are not to scale nor do they represent how close the molecules are to each other or the way they are laid out exactly in relation to the earth or each other. They are positioned this way for you to easily visualize how the density of the air changes with altitude and to better understand how it affects performance. It does not talk about how the air is compressed and becomes more dense, it simply shows that the air is less dense as you go higher.
When you hear “high density altitude”, it does NOT mean that the air is dense (thick) like most people think. You can’t just look at the words “high and density”, that of course would mean the air is dense. You need to look at the whole thing. When you hear the words “high density altitude”, it’s referring to the density of the air at a higher altitude.
For example, your home town airport has an elevation of 1000′ above sea level. You tune in the automated weather station and you hear it say that the density altitude is 3000′. That is a high density altitude because it’s higher than the field elevation at your airport. It is saying that the density (amount or thickness) of the air at your airport is equal to what it would be at 3000′. I will explain more in a minute with a diagram.
So what does the air density do as you go higher? If you don’t remember, think of going so high that you are in space. What is the density of the air there? The air density is much less. To make that even easier to understand, don’t think of all the empty space around you as air. Think of air as a bunch of balls (molecules). The amount of balls (molecules) there are determines the density of the air (molecules). If I fill a box with the balls (air molecules), it is dense with air. If I take a box that is twice the size and dump the balls from the smaller box into it, I have the same amount of balls (air molecules) in it but since they are not filling the box now, it is no longer dense with air.
This is the same concept you need to think of as you fly higher. People think that as you go higher, there is less air. That is not true. Think of the box scenario. As you go higher, you still have the same amount of air, but the air isn’t as dense (tightly packed together). Look at the diagram below and notice how there is the same amount of air molecules at a higher altitude, but they are farther apart from each other.
 Notice how as you go higher, the air is less dense (packed together), but the same amount of air molecules is still there. So how does this affect you? The airplane needs air to fly. When you’re taking off, you have to get to the right speed before there is enough air (molecules of air) traveling over and under the wing to support lift.
The airspeed works the same way. As you accelerate down the runway, the balls (air molecules) are going into the pitot tube faster and faster and the pressure is increasing. The total pressure is what gives you your airspeed reading. Look at figures 2 and 3 below and to see how the density of the air at different altitudes affects performance.
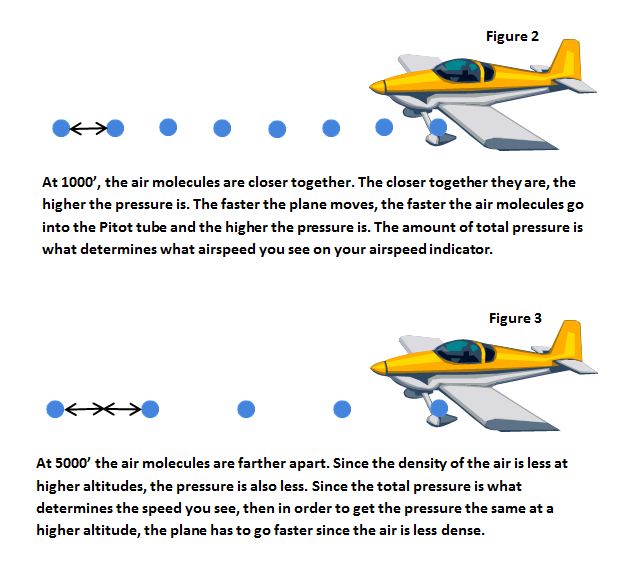
So, let’s look at the above example in a take off situation. In figure 2 above, lets assume that our field elevation is 1000′. When the balls (air molecules) start entering the pitot tube and the pressure increases enough to indicate whatever your lift off speed is, then you’re ready to fly.
In figure 3 above, your field elevation is 5000′. Since we know the air is less dense (air molecules are farther apart) at higher altitudes, we know that we have a farther distance to travel to get to the next molecule of air. If we have farther to travel but we need the same amount of pressure to give us the required lift off speed, then we will have to go faster to do so. To go faster takes more time. More time traveling means more runway being used. This is the reason it takes more runway distance to take off at a high elevation airport. The same applies for landing. To keep the speed indicating properly when landing at a high elevation airport, you need to be traveling faster. Even though the speed is indicating the same, you will be flying much faster over the ground and using up more runway in the process.
The last part of this article, is heat. Heat affects the plane the same way high altitude does. As it gets hotter outside, the air becomes less dense. As the air becomes less dense, the plane will use more runway to get to flying speed just as if it were at a high elevation airport. When you hear the automated weather say that the density altitude is at 5000′ for example, that means your plane will perform as if you were flying at an elevation of 5000′.
High density altitude, high airport elevation and heat all mean more runway, slower acceleration and and worse performance. Always be sure to check your performance chart so you know how much runway and what kind of climb rate you will get before taking off. You want to be sure the runway is long enough and that you will clear the obstacles at the end! Sign up for our free newsletter for more information about how this can affect you and for other tips, advice and recommendations sent to your email.
by Joseph Standley | Jun 26, 2012 | All Pilots
Today I heard of an accident near my home airport. There was a guy that contacted approach control and said that his plane was on fire and that he was going to try to make it to the airport. The airport was from what I understand was 8 miles away. He was going to try to fly 8 miles while on fire! He didn’t make it.
If you’re ever on fire, get down NOW and put the plane on the ground as quckly as possible! The PTS requires that a pilot demonstrate an emergency descent, which would have been this guys best option. It used to be that just commercial pilots had to demonstrate these but as of recently, you have to do it as a private too.
As you know, when you have an engine failure, you pitch and hold best glide speed while looking for a field. You are usually in the air for quite awhile and have a lot of time to figure things out. The difference between a normal engine failure landing setup and an emergency descent is that the emergency descent requires immediate reaction and a descent as fast as possible. A perfect example would be if your plane was on fire.
If your plane is burning, you have very limited time to get down. In a matter of 5 minutes, you’re whole plane could be engulfed in flames. There’s no time for best glide speed or choosing the perfect field. The first thing you need to do is cut off the fuel. Yes, that means you will be shutting off your engine. The alternative is to continue pumping fuel into the fire. Now to get down quickly, you don’t want to just push the nose forward because you will build up excess airspeed which will be hard to bleed off when trying to land.
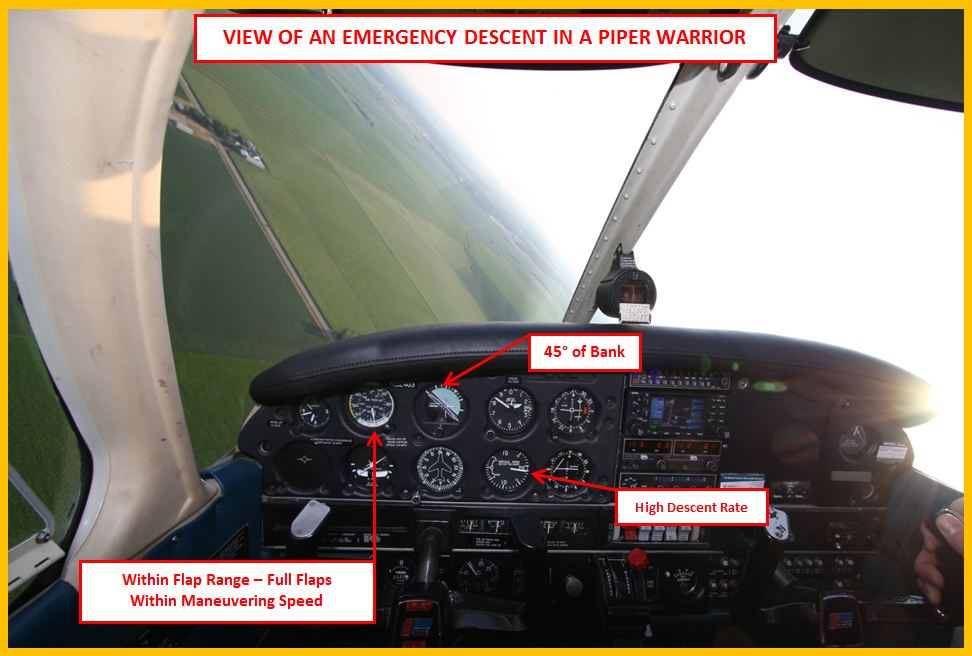
The way that works the best is to put in full flaps (as long as you’re in the flap operating range) and start a descending turn using 45° of bank. You want to pitch forward enough to keep it in the white arc. Keep the speed near the top of the white arc but not quite on the edge of it. This should give you around a 2000′ per minute descent rate (in a Warrior), just keep pitching to hold the best descent rate within the capability of the plane you fly while keeping it in the white arc.
While you are turning, look at the fields directly around and below you and plan your roll out as you get close. Your control inputs should be gentle so that you don’t have any sudden movements which could damage the plane. By the time you roll out and pitch back up to a more normal attitude for landing, the slower descent airspeed, plus the drag of the flaps will slow you down quickly to a normal landing speed.
On your way down you should definately turn off the heater or any vents that are open between you and the engine compartment to slow or stop the fire or smoke from entering the cabin. Flying the plane is always number one, but if time and altitude permit, grab the checklist to be sure you’ve done everything you can. Again, this is only if you have the time. Concentrating on getting the plane down safely and getting out as fast as possible is the real goal.
Never try to make an airport that is far away while on fire. It’s not worth your life. Fire can heat metal to a melting point. Even if it never gets to its melting point, it will weaken it. Strucural failure could happen before you make it to the ground, so don’t mess around with it. Once it makes it to the cabin, now you have to worry whether you are going to make it. If you’ve never done an emergency descent, get with an instructor and learn it, because it could save your life one day!


