by Joseph Standley | Aug 6, 2012 | Student Pilots
What are S-Turns across a road for?
This article is about how an S-Turn helps you and the common mistakes with S-turns across a road. The purpose of S-Turns and other ground reference maneuvers is to prepare you for landing. During the S-Turn you are at an altitude that is the same as the typical traffic pattern. You are learning about maintaining the proper speed, wind correction and also timing your rollouts to be on a specific heading at the right time. You are developing your hand – eye coordination and learning how much control input is needed and when, to accomplish your goal. When you are making your turns in the pattern and timing your turns to final you are doing the same things you’d be doing during an S-Turn.
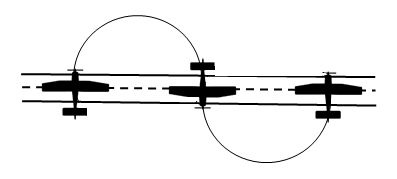
In an S-Turn across a road, you are putting in just the right amount of bank to make sure you stay the same distance from the road on both sides. During the beginning, the half way point and end of the maneuver, the plane has to be wings level, with the wings parallel to the road just as it reaches the road. See below for these three positions.
What an S-Turn should look like

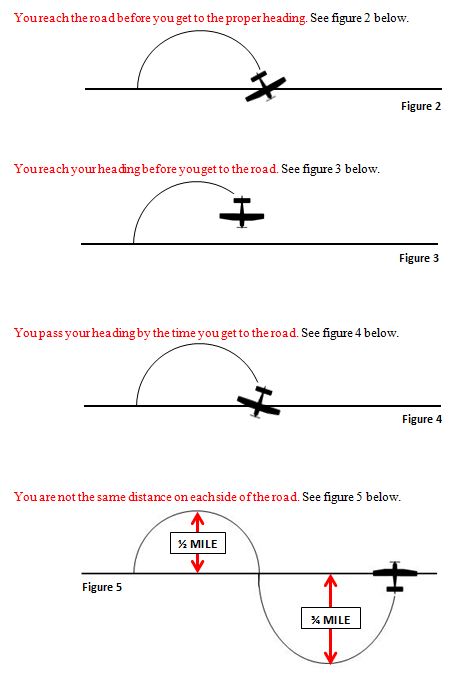
When the plane starts the maneuver it is perfectly lined up with it’s wings level and parallell to the road. At the half way point, it is excatly the same, but heading the opposite direction. The last part will look exactly as it did when you started. The half circles on each side of the road should be the same distance from the road on both sides. Many people struggle with the timing of the roll out as they get to the road. It needs to be timed so that at the exact moment you are reaching the road, you are just finishing leveling off the wings while pointing the exact opposite direction. You need to do a gradual roll into and out of the maneuver. Many people will hold a steep bank all the way to the road and quickly roll wings level as soon as they get to the road. This is not what you want to do. It has to be a gradual roll out timed to be level just as you reach the road. See below for common mistakes.
Common mistakes and reasons for check-ride failure during an S-turn

While practicing these maneuvers, try to avoid the above mistakes. Judge your distance accurately and time your roll outs properly while holding altitude and airspeed and you will do perfect S-Turns. Yes, you have to hold altitude and speed too! Have fun and don’t forget to enter the maneuver with a tailwind!
As of the writing of this article, we are just about finished with a couple more E-Lessons; one of which is about ground reference maneuvers. For those who have a hard time understanding where to look and how to judge distance, etc. the lesson will have actual IN FLIGHT photos of the maneuver with detailed instructions along with diagrams like those shown above to show you where you are in the maneuver as it is being done.
by Joseph Standley | Aug 2, 2012 | All Pilots
ARE YOU THINKING ABOUT BUYING A PLANE BUT AREN’T SURE WHETHER IT’S WORTH IT?
I’ve had many students that have completed their private pilot training and immediately bought their own plane afterwards. Some actually buy planes before they even get their license! So which is better? This really depends on you and your defintion of better.
From a cost standpoint, it is usually cheaper to rent. I say usually because most people only fly 50 hours a year. If you’re someone that plans on flying a couple of hundred hours a year or more then renting may not be for you. From a convenience standpoint, it is better to own. They both have advantages and disadvantages. Let’s look at some of them. We will start with renting. (more…)
by Joseph Standley | Aug 2, 2012 | All Pilots
When compared to flying an airline, flying small plane has some nice advantages! If you’re only traveling a couple of states away, then a small plane would probably be better. A small plane doesn’t seem like much of an advantage at first glance, but let’s look a little closer. (more…)
by Joseph Standley | Jul 26, 2012 | Pilots, Student Pilots

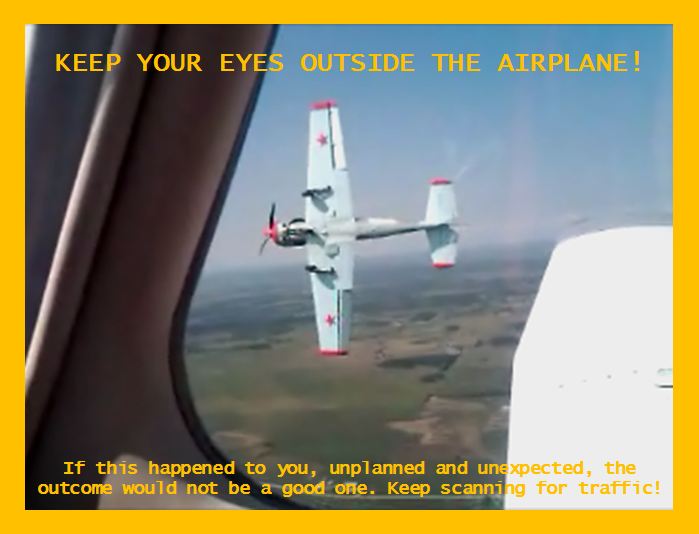
You as a pilot are responsible for collision avoidance. That means, in order to avoid a collision you have to be looking outside the plane! I see so many students and pilots both staring at the instruments instead of looking outside. I will remind them to look outside and for a brief few seconds they look up and around and then fall right back into their instrument panel coma.
This habit has to be broken or it will continue until you aren’t so lucky anymore.. There are many things that keep pilots from looking outside, such as trying to learn something inside the plane, distraction from passengers or even your new aviation toy. You need to learn to multi-task. I’ve asked pilots to turn to a certain heading, just to have them roll into a turn without ever even looking where they are going.
The average general aviation airplane used for training goes around 120 mph. If cars were driving down the street at 120 mph, and you were a passenger, how would you feel if the driver kept pulling out into the street without looking before he turned? The longer your head is down, not looking out, the more you risk death.
Keep scanning for other planes and don’t stop. If you see one out in the distance and it doesn’t seem to be moving, you are probably on a collision course. If you are heading towards each other and both going the same speed, you are closing in on each other at a speed of almost 250 miles per hour! In just a few seconds, you’d be right on top of each other and you wouldn’t have enough time to react. At least if you see it, you can divert your course to avoid a collision.
Whenever I see my students staring inside (which is usually while doing take off and landing practice), I cover up the instruments. I cover all of them. They usually ask how they are supposed to know their speed. I tell them that if they put the plane in the position it normally is for landing, then the speed will fall into place. You don’t need to stare at the airspeed because if you’re holding the plane stable, the speed will stay stable too. If you’re raising the nose, the speed will slow down. If your letting the nose drop, it will speed up. Look at the horizon and you can see it. You can also hear the engine changing.
When it comes time to take off, they worry because they don’t want to rotate too soon or climb out to slow. I tell them that we’ve done it enough times to know what it should look like, feel like and sound like. When you think we are at rotate speed, then rotate. Put your nose in the climb attitude during the climb that we always use and things will be fine. I also tell them to level off when they think we are at pattern altitude. Yes, the altimeter is covered too.
During climbout I will pop off the airspeed cover for a second just to show them that the speed is just fine. Every single time, it has been within 5-7 knots which is within PTS standards. They usually ask again, when to level off. I remind them to do it when they think we are at pattern altitude. After leveling off, I again show them and most of the time, the altitude is within 100′. Only one time was someone off more than that and they were only 200′ off. They did just fine without having any visual reference to any of the instruments. It just proves that you know the plane better than you think you do! We continue several circuits in the pattern like this before I pull off the covers. I say, now that you know you can fly without looking inside at all, keep your eyes outside! They are always amazed at how close they were on speed and altitude.
You need to know your plane well. Focus your attention on how the plane sounds, what it looks like outside while you are doing different maneuvers, etc. You need to realize that you know the plane better than you think you do and get more confidence in your ability. Before you know it, you will be looking outside 99% of the time while holding heading and altitude without a problem. Practice with an instructor sometime and see for yourself! It’s easier than you think.
by Joseph Standley | Jul 12, 2012 | Pilots, Student Pilots
Do you know what causes carburetor ice? Many people struggle with understanding how things work when it comes to engines or mechanical things. Rather than get into pictures of a carburetor and go into complicated examples of exactly how a carburetor works, I will make it easier to understand by describing it in simple terms.
To start with, just as you need air and food to live, an engine needs air and fuel to run. The air and fuel have to get into the engine somehow. There is an opening for that called the carburetor. The carburetor has air directed into it through the holes on the front of the plane which are connected to tubes leading into the opening of the carburetor. Fuel also goes into the same opening, just as your air and food go into your mouth.
When the air and fuel are going into the engine as it should, then everything is fine. Cut off the fuel by pulling the mixture back all the way or block the air holes going into the engine and it stops running, just as you would. Now, I want you to think of the carburetor as a funnel. There’s a big opening on one end tapering off to a small opening at the other end. Air enters the big end of the funnel as it goes into the engine. As air enters into the big opening of the carburetor, it continues into the narrower end before going into the engine. As the air passes through the narrow end, it moves faster. As the air moves faster, it cools down.
Try this as an experiment; hold your hand up to your mouth. With your mouth open as if you were saying “ahhh” at the dentist, blow on your hand. You will notice that blowing on your hand with your mouth open wide produces warm air. Now do the same thing, but this time with your lips close together (restricting the opening like a funnel) like you would when you blow out candles. What you will notice is the air is moving faster and it is cooler. This is the same thing that is happening as air enters the carburetor on its way into the engine. Now wet your hand and do the same thing and it will be even cooler due to evaporation of the wet surface. When the fuel which is also going into the engine vaporizes (turns from a liquid to a gas), it causes the temperature to drop much more. This accounts for the biggest drop in temperature. The difference is that the temperature drop in the carburetor can actually drop to below freezing as the fuel vaporizes!
Now that you know a little about the carburetor and what happens with the air entering the engine through the carburetor, let’s talk about the air. Air holds moisture, just like a sponge. When the sponge gets completely soaked and can’t hold anymore, the water will fall off the sponge. The air does the same thing. When the air gets completely saturated with moisture, it rains. The temperature of the air makes a difference in how much water it can hold. Warm air can hold more water than cold air. When you bring a glass of ice water outside on a hot summer day, what happens? The glass gets wet on the outside. This happens because the ice water is making the air surrounding the glass cooler than the rest of the air. The cooler air can’t hold as much water as the surrounding warmer air. It becomes saturated and will not hold any more water so the water starts running down the side of the glass.
Put both of these together now and you have a setup for carburetor ice. On a summer day, even if it’s 70° outside you can get carburetor ice. Remember, that as the air enters the carburetor, it cools down. If the warm air coming in is holding enough humidity, the moisture will release just as it does on the glass. If the temperature in the carburetor happens to drop to below freezing temperatures, then the moisture that is forming from the temperature drop will freeze inside the opening of the carburetor. If the moisture freezes and starts to build up, it will begin to restrict the amount of air going into the engine as it blocks the opening and it will start running rough because it no longer has enough air. As the ice builds up and the opening gets smaller, an engine failure will soon follow. I hope this helps you understand things a little better. Sign up for our free newsletter for more good tips and find out more on carburetor ice and what to do if you get it in one of our future email newsletters.


